Trail building events are a great way to meet people, give back to the community and learn more about the hows, whys, and whos of trail building. It takes countless hours of volunteer time to keep St. Louis' trail systems in good shape through maintenance, reroutes and expansion. Since a picture is worth a thousand words, we will help explain what's going on in each photo.
Flowy Singletrack
When singletrack is flagged GORC doesn't just meet up in the woods and begin laying down pin flags. In most cases before the first pulaski ever hits the dirt, several months, if not over a year, have passed. In that time GORC trail stewards will meet with land managers, scout trail features, design initial trail lines, adjust the potential lines, perform a GORC peer review, and finally get final design approval from the land managers.
 First, look at the tape around the tree trunks. Note the direction they are tied. The tied knot always faces the trail corridor. So, if you look down the tree line where trunks were marked every 30 feet or so you can see that the knots are facing the trail bed. This allows the trail designers to see how the singletrack will thread between the trees. When you are walking through a forest it can be hard to visualize where the designed trail is supposed to go if the initial flagging knots are not synchronized.
Next, check out the two trail tape colors. It doesn't matter which color is used - we typically use the standard orange tape. When alternate lines are found or during a peer review some designers see a different way of doing things we will mark the alternate lines with a different color tape. Again, this is so we don't confuse ourselves and this helps us visualize our options quickly. The tape is affixed at shoulder to head height were possible to facilitate line-of-sight and clinometer use.
After a GORC peer review with other trail stewards - that are not directly associated with the design - is complete and a final line is selected, we will get the land manager's approval. Once the design is signed off we prepare for the trail building event by laying out pin flags on the forest floor. Depending on the trail steward, pin flags are placed on the high or low side of the trail. They are spaced 5 - 15 feet apart so all the volunteers can see where the trail bed should go. Tight, intricate and complex trail segments may feature pin flags only a foot apart to show volunteers exactly where the singletrack must go. Leaves are raked to the low side of the trail so the dirt is exposed and the work begins. The trail bed is cut in to the hill slope with the final tread left 3% - 5% off-camber to facilitate water drainage and prevent pooling. The tread backslope is beveled at a 45 degree or less angle to keep water flow from eroding the backside of the slope. You can see in the picture how the high side slope is angled or feathered.
The dirt that is removed in the making of the bench cut is scraped off the trail on the down side or slope. The dirt must be pulled far enough away so that trail users do not think the "fluff" dirt is part of the solid tread. If the fluff is used as a trail bed it will quickly rut, and worse, erode. It is very important that only the bench cut is used as the tread. This is also why we must make the bench cut wide enough for multi-use traffic, especially at places that have a high equestrian use such as Greensfelder.
Lastly, you can see the new trail is not just a straight cut through the trees. It is designed with flow in mind - this keeps all trail users engaged with the trail and entertained. The trail appears more natural this way. The singletrack is designed around the mature live trees. Only saplings and deadfall are cut and then only sparingly. Large, old growth trees are used as trail anchors and keep the singletrack line from drifting or migrating when horses or bikers may want to use an easier path. If you ever visit a trail system that has few trees you can see how the trails can be very wide from trail drift. A trail system like SIUE prevents singletrack from growing wide due to the thick undergrowth. Next time you ride, check it out.
Trail Building Obstacles and Critical Line Selection
 Flush cut stumps or large dead ones must be removed with lots of hard work. You may think singletrack can just go through the forest willy-nilly but when you factor in fall-line issues, grade percentages, line of sight and the flow of a given radius curve you can understand why a simple stump can get in the way of our trail bed.
Sometimes a stump or stob is almost in the middle of a critical spot on the trail. And due to the mystical ways of trail flow and water science, singletrack occasionally needs to go exactly where a small to small-medium tree is established. Trying to design below (or above) it and the trail might feature a crazy-sharp non-flowy turn, a steep step-up and poor line of sight (on a bad turn, no less).
Trail Tailings and How to Prevent Trail Drift
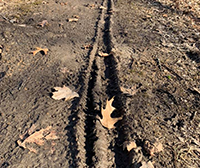
This photo depicts the need to remove excess dirt from the trail side. This trail piece curves around a drainage bowl and all too often we see our trails drift. Equestrians and bikers, by their nature, want to use the easiest path available to them. This would mean cutting the contoured trail curve and walking in a straight-shot over the fluff. Eventually, this creates a maintenance issue as the used line would pot-hole and erode to an off-camber mess. Not too mention the tread would grow 10-15 feet wide and never look quite the same again.
The extra dirt is removed further down the drainage to "show" trail users the intended trail line. With the excess dirt gone, the downslope contour is visibly unsustainable, undesirable and not worth the effort to shortcut. This is an important step in the trailbuilding process that cannot be emphasized enough. The trail is not finished until the fluff dirt is removed away from the benchcut.
The Weed Wrench Saves Time, Energy and Your Low Back
You may notice larger tree saplings that are cut waist-high or higher. GORC used a tool called a weed wrench that can pull these stobs out of the ground, roots and all. The tool needs a bit of trunk length to use as leverage when pulling the roots out of the ground. Simply cutting saplings flush to the ground presents maintenance and other issues.
 As a trail beds in over time and the dirt settles the stump will seem to grow higher and higher out of the ground. The roots will become exposed and eventually rot. This can lead to trail erosion and is an eyesore to all user groups. A cut tree stump is an unnatural feature that is man-made - a negative feature that is better removed during the original trail construction process.
Hopefully after reading this you have had some of your questions answered and hope to see you out at a trail building event in the near future. GORC is always seeking out new volunteers and members.